Verify Your Email Address
Please ensure to verify your email for confirmation. We recommend checking your spam and trash folders as well.


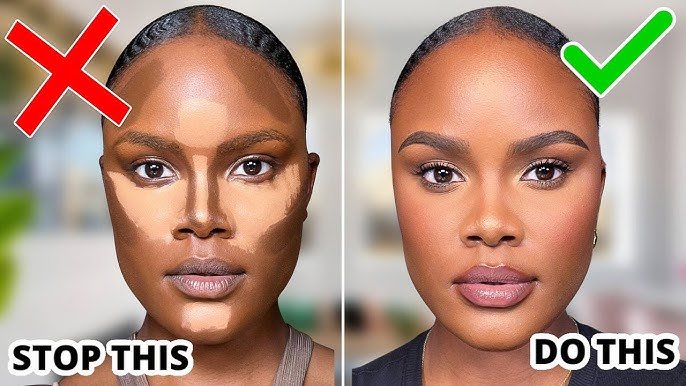
Nowadays most of the people ask a question How To Blend Contour? Contouring Controuring is not a thing, it is a make-up thing that defines, accentuates and sculpts the structure and shape of the face. It’s not just about adding shadows to your face also but enhancing your natural features to create a flawless look. The right contouring can give anyone the illusion of deeper or more pronounced features, regardless of whether you want just a slight enhancement or an over-the-top makeover.
For many, the concept of contouring can seem quite intimidating but the secret to nailing it all comes down to this one vital step: blending. Blending helps to keep the contour product from looking like it is just sitting on the skin and allows it to seamlessly melt into your skin to achieve a soft and natural finish. Regardless of your makeup expertise, once you know how to contour step by step, it can become relatively easy to master doing your makeup, resulting in a flawless look, time and time again.
If you’re planning the occasion of your choice or looking to improve your daily makeup, knowing the best way to mix contours is crucial. In this post we’ll explain the essential information you should be aware of when it comes to contouring, from basic to latest techniques to ensure that you achieve the highest quality result that is seamless. If you are just beginning to learn about makeup or are looking to sharpen your techniques, this step-by-step tutorial is the best resource for achieving the best contouring.
Contouring is a technique for makeup which uses darker colors for shadows as well as lighter hues to emphasize certain parts that make up your face. Applying contour products strategically to specific areas, such as cheekbones, jawline and even the nose, you will be able to highlight your facial features and achieve a more contoured look.

The most common method of contouring is the use of a contour stick cream or powder and highlighters to emphasize the highlights in your facial. This process is either subtle or strong as you want, based upon the appearance you’re hoping to achieve. The most essential aspect of contouring is mixing with the other products in order to make sure that there aren’t any sharp lines apparent, which gives you an even and natural look.
Long-Lasting Definition
Properly blended contour ensures your makeup stays in place throughout the day, maintaining a defined look without the product fading or moving.
Flawless Finish
If blended properly the contours will not leave visible lines. Blending makes a seamless transition between your highlight and contour making sure that the result looks natural.
Customizable Look
Blending allows you to have complete control over the strength of the contour. It is easy to adjust the amount of product used and blend to produce an ethereal or dramatic result.
Blending contour is not as difficult as it seems. Here’s a step-by-step guide to help you perfect your contouring technique:
Prior to applying any type of cosmetics, it’s important to begin with a clean and well-hydrated face. Make sure to cleanse your face thoroughly, removing all dirt or oils and then apply a moisturizing cream appropriate for your skin type. This creates a silky base to apply your makeup.
Then, apply a primer that will help the makeup last longer as well as for a smoother surface to contour. An excellent primer will help make the makeup blend seamlessly to the skin.
Pick a contouring cream which is in harmony with your skin or that is two to three shades darker. The most common contours are along the jawline, cheekbones, the temples and your the nose. Make use of a cream or stick formulation for effortless application.
With a makeup sponge, or contour brush Apply the product using small quantities onto the affected regions. Beginning with a thin application. Then, build it to a higher level if needed. It is important to blend the color with each application to avoid rough lines.
Blending is by far the most crucial aspect of contouring. To blend, make use of an icy makeup sponge that is damp or a soft contour brush. The sponge assists in pressing the contour of the skin. The brush can soften edges, and blends the makeup seamlessly.
Start at the corners of the contour. Then move towards the inner edges with small circular motions to distribute the product. To create a natural appearance apply your contour upwards across the cheekbones, and then blend it with the hairline to create smooth transition.
After you’ve blended your contours, you’re now ready for you to put on the highlighter. Pick a highlighter color which is a few shades lighter than the natural skin shade. Apply it on the top areas of your face, such as the cheekbones’ tops and the nose bridge the middle of your forehead as well as your cupid’s bow. Make use of a tiny brush or sponge to apply the highlighter evenly onto your skin. Ensure that you blend it well with your contour of your face to create a flawless appearance.
In order to ensure that your contour stays on throughout the day, apply your makeup using a light setting powder. Sprinkle powder evenly all over your face. This will help to keep the makeup, and focus specifically on areas that are likely to become oily.
You May Also Read : How Do You Make Eyeshadow More Pigmented
Contouring has totally changed my routine for applying makeup. Understanding how to blend contours each step of the way makes the whole process seem easy. It has made a big difference with the way my face appears, thanks to distinct cheekbones, and a defined jawline. The secret lies on the blending as it provides a smooth and natural appearance that makes an enormous impact. It is highly recommended to give contouring a shot, especially when you’re looking for an even more structured and defined appearance.
Knowing how to mix contours step-by-step is essential for achieving an impeccable and sculpted appearance. By using the correct products and methods, contouring is able to improve your appearance as well as help you get the perfect look every time. No matter if you want a soft look or a powerful, dramatic style, mixing is the trick for getting it done right. If you follow these guidelines and guidelines, you’ll start creating a flawless contour within a matter of minutes.

